Hi game dev folk, this is Piyush Nitnaware from Spark Creative, Tokyo, Japan.
Merry Christmas to ALL in advance.
I am trying to keep myself motivated by writing this blog on early Christmas eve.
Today's topic is to use compute shaders for Post Processing in Unity3D.
There are multiple ways of adding post-processing effects, the use of compute shaders is one of them. All are having some pros and cons, knowing this technique might be advantageous.
So any further delay, let’s dive into the topic.
First thing first.
What is a compute shader?
In simple words, compute shaders are small programs that run massively parallel on the GPU side.
We use compute shaders to compute complex or simple yet iteration heavy programs, by taking advantage of GPU parallel architecture.
Compute shader compatibility.
Since compute shader was recently launched, it has some hardware dependencies.
For more info please visit the Unity official website.
For safety, you can add a check SystemInfo.supportsComputeShaders() which returns a bool, if false then fallback to another compatible technique to achieve the same result.
Let’s get started.
Here is a Free Unity asset which I am using for this demo.
First, create a Compute Shader asset by right-clicking on the project window.
Create->Shader->ComputeShader
Give any name as per your choice.
I am naming it a ‘PostProcessGrayscaleMask’ because I am grey-scaling the whole screen and only the mouse hover part will be colored.
Then replace the following code with the existing one.
// Each #kernel tells which function to compile; you can have many kernels
#pragma kernel CSGrayscaleMask

// Create a RenderTexture with enableRandomWrite flag and set it
// with cs.SetTexture
RWTexture2D<float4> Result;
Texture2D<float4> SrcTexture;

float4 MaskPos;
float MaskRadius;

float GetMask(int2 maskPos, int2 pixelPos, float maskRadius)
{
    float2 maskVec = (float2) maskPos - (float2)pixelPos;
    return smoothstep(0, 1, maskRadius - length(maskVec));
}

[numthreads(8,8,1)]
void CSGrayscaleMask(uint3 id : SV_DispatchThreadID)
{
    float mask = GetMask(MaskPos.xy, id.xy, MaskRadius);
    float4 srcColor = SrcTexture[id.xy];
    float4 grayscaleColor = (srcColor.r + srcColor.g + srcColor.b) / 3.0;
    Result[id.xy] = lerp(grayscaleColor, srcColor, mask);
}
Here is a simple explanation of the above code.
First we declared the kernel CSGrayscaleMask, which is nothing but our CSGrayscaleMask(uint3 id : SV_DispatchThreadID) function which we have defined below in the script.
To grab the function, we need to create a handle, which we can do using kernel directive. It's mandatory that the compute shader assets should and must have at least one kernel directive.
If you are aware of Unity shader lab coding, we declare
#pragma vertex vert
#pragma fragment frag
Like vertex and fragment, Kernel is also a predefined directive.
Now let’s look at the variables
We are using RWTexture2D and Texture2D data types. RWTexture2D is also a Texture2D with read-write enabled. Just keep in mind that use read-only data types for the data which we are passing to the compute shader as a raw data and use read-write data types for the data which we are expecting as a result.
Since compute shade is a standard DX11HLSL language, all the primitive data types are supported.
Float4 is the HLSL way of writing Vector4 and float is a float :).
Take a look at the HLSL site for more info.
https://docs.microsoft.com/en-us/windows/win32/direct3dhlsl/dx-graphics-hlsl-data-types
Get Mask Function
float GetMask(int2 maskPos, int2 pixelPos, float maskRadius).
This function uses simple vector math to calculate the mask radius.
Since maskPos and pixelPos both are vectors (int2 as a vector2Int in Unity C#). We are calculating the displacement vector by subtracting the current pixel position from the mouse position. Then we are comparing the length of that vector with the maskRadius. For that we are using smoothstep hlsl function, which returns the value in 0-1 range.

The core of the our post-processing logic CSGrayscaleMask()
[numthreads]
When we request GPU to execute this compute shader function, GPU will split this work into groups and schedule them over multiple threads parallel.
We need to specify how many threads each group should have, by adding the numthreds[x, y, z] attribute.
numthreads[1, 1, 1] -> most simplest, this makes each group run only on a single thread.
numthreads[8, 8, 1] -> runs over 64 threads, and the default one.
We also can achieve 64 threads by mentioning,
Numthreads[64, 1, 1], but in this case we are using only one dimensional threads.
Converting to grayscale
Converting any color pixel into grayscale is very simple.
we just have to make the RGB value equal. Any image whose RGB value is the same, it's a grayscale image.
(Black (0, 0, 0), White (1, 1, 1) and gray (0.5, 0.5, 0.5))
Inside the function, we are getting the value of mask (0~1) then we are using lerp function to get the color from grayscale to source color.
Our post-processing engine is ready, but wait, we also need a driver!!
C# Script driver
Now create C# script file which will drive our compute shader script.
Create->C# Script. Again I am naming it as a “PostProcessGrayscaleMaskExample”.
Replace the following content with the existing one.
using System.Collections;
using System.Collections.Generic;
using UnityEngine;

public class PostProcessGrayscaleMaskExample : MonoBehaviour
{
    [SerializeField] protected ComputeShader computeShader;
    [SerializeField] float cursorMaskRadius = 50.0f;
    Vector4 mousePos;

    protected RenderTexture OutputTexture;
    protected int kernalHandle;

    protected void Awake()
    {
        kernalHandle = computeShader.FindKernel("CSGrayscaleMask");
    }

    protected void OnEnable()
    {
        CreateTexture();
        SetShaderParameters();
    }

    void CreateTexture()
    {
        OutputTexture = new RenderTexture(Camera.main.pixelWidth, Camera.main.pixelHeight, 0);
        OutputTexture.enableRandomWrite = true;
        OutputTexture.Create();
    }

    void SetShaderParameters()
    {
        computeShader.SetTexture(kernalHandle, "Result", OutputTexture);
    }

    protected void OnDisable()
    {
        ClearTexture();
    }

    void ClearTexture()
    {
        OutputTexture.Release();
    }

    void UpdateParameters(RenderTexture source)
    {
        computeShader.SetTexture(kernalHandle, "SrcTexture", source);

        mousePos.Set(Input.mousePosition.x, Input.mousePosition.y, 0, 0);
        computeShader.SetVector("MaskPos", mousePos);
        computeShader.SetFloat("MaskRadius", cursorMaskRadius);
    }

    private void OnRenderImage(RenderTexture source, RenderTexture destination)
    {
        UpdateParameters(source);

        uint x, y;
        computeShader.GetKernelThreadGroupSizes(kernalHandle, out x, out y, out _);
        computeShader.Dispatch(kernalHandle, (int)(Camera.main.pixelWidth / x), (int)(Camera.main.pixelHeight / y), 1);

        Graphics.Blit(OutputTexture, destination);
    }
}
Here, is a simple explanation of the above script.
ComputeShader
We are creating an object of compute shader, so that we can assign the reference of our compute shader asset later in the inspector.
In the Awake method, we are creating a kernel handle.
kernalHandle = computeShader.FindKernel("CSGrayscaleMask")
Please make sure that the name string which we are passing in the FindKernel method, should match with the Kernel name which we have defined in our compute shader.
RenderTexture
Since we are manipulating the final rendered image, we need a RenderTexture variable which can hold the final output.
In the CreateTexture() method, we are initializing the RenderTexture variable.
RenderTexture is a special variable, we need some extra steps to properly configure it as per our use.
First, enable the random write and then call the Create method.
For more info please visit Render Texture Unity Docs.
SetTexture
Compute shader isn't aware of our output texture (Render Texture), we can link it with the Result (RWTexture2D) using SetTexture method. While calling this function we also need to pass the kernel handle, the variable name itself, and the RenderTexture variable.
SetVector
To set variable values in the compute shader, we need to use appropriate methods. For setting float4 we have to use SetVector, and for setting the float value! you guessed it, it’s SetFloat method.
Have a look at compute shader Unity docs.
Now attach the script to the main camera game object. Observe that the script is using OnRenderImage() function, which only gets called if the attached Camera component is enabled. We should make sure that we are attaching this script to the camera which is active (mostly the main camera).
Since our script is dependent on the Camera component, we also can add dependency of the camera component by writing [RequireComponent(typeof(Camera))].
OnRenderImage() function gets called after every frame is rendered and before display on the screen, therefore all the image manipulation logic will come here. first, we are updating all the compute shader variables with the updated values. Then we are calling the dispatch method with the thread groups. Since we have defined numthreads[8, 8, 1] in the compute shader. Therefore, it's our responsibility to divide the work equally to all thread groups. That we can do easily by dividing the screen width and height by 8 and z thread will be 1.
We also can get threads value from the compute shader itself, using the computeShader.GetKernelThreadGroupSizes() method. By doing so, we no longer need to assign hardcoded values in the dispatch method. Instead, we can use the thread values which GetKernelThreadGroupSizes function gives us.
Graphics.Blit()
Graphics.Blit function simply copies the data from source to destination texture, that all it does.
Before hitting the play button, set the compute shader reference in the inspector.

Now if you play the scene, our first grayscaled post-process effect is working.
Voila…
Now let’s check the Frame Debugger.
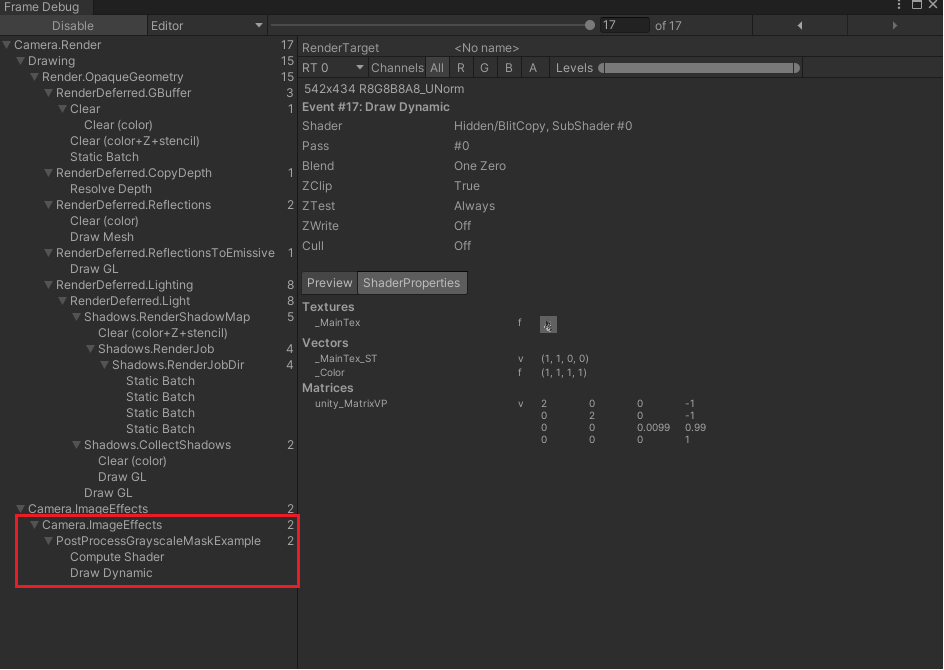
Note that each compute shader dispatch takes at least 1 draw call. If you have multiple compute shader dispatchers then it will take that many draw calls.
Now check the profiler.

Since I am checking this on the editor, it may or may not be accurate but at least we can get some idea of how much time it’s taking to perform our task. In my case, it’s taking about 0.014ms, which is pretty efficient. But it’s highly dependent on the hardware.
There are more samples
These are some post-processing samples which I have created using compute shader, have a look. For better understanding please go through the C# and compute shader code.
Color overlay
Screen Blur
Screen Bloom

Hope you enjoyed the read and learned some basics of compute shader.
Thank you very much and have a wonderful new year.
Reference links
Unity Compute shader
https://docs.unity3d.com/Manual/class-ComputeShader.html
Cat Like Coding
https://catlikecoding.com/unity/tutorials/basics/compute-shaders/
Youtube links:
https://www.youtube.com/watch?v=BrZ4pWwkpto&t=725s
https://www.youtube.com/watch?v=9RHGLZLUuwc