
Hi, my name is Piyush Nitnaware and I am client engineer at SPARKCREATIVE.co.jp.
This article shall give you an insight of Unity's new way of programming. Unity has had a new addition in the system known as DOTS (Data Oriented Tech Stack) and ECS (Entity Component System) is a part of this new addition and is available in Unity 2019 and later.
Introduction
Till ECS was introduced, OOP (Object Oriented Programming) was the only available way of programming in Unity engine however that wasn't performant enough. ECS is basically a new way of writing code in Unity and it encourages to focus on Data Oriented Tech Stack instead of Object Oriented Programming.
Let’s have some brief understanding about DOTS and ECS.
Data Oriented Tech Stack consist of C# Job System, Burst Compiler and Entity Component System. ECS allows us to write extremely performing code and provides us much better way to structure data.
E - Entity - It is used to group together components, much like lighter version of traditional game object.
C - Component - It act as containers for data that are related to the entity. Unlike traditional mono behaviors these components don’t have any logic.
S - System - It defines component based behaviors i.e., it contains logic. And logic manipulates the data.
Memory Handling in ECS and Traditional method
Unity's traditional way of handling memory was not very optimized. Below is an illustration of Unity’s traditional way of keeping data in a memory. Scattered data in the memory results in low performance.
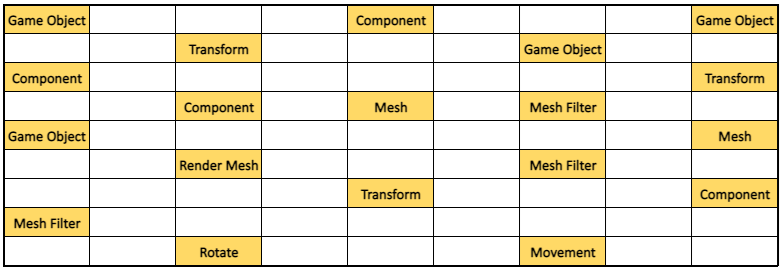
An illustration of memory handling in traditional method
On the other hand, ECS tries to group data into chunks and keeps the data as close as possible in the memory. Components are more likely organized in the memory.

An illustration of memory handling in ECS
Approach with MonoBehavious
Unity’s traditional way of handling data and systems is still present and available in Unity. MonoBehaviour allows us to work with data and system simultaneously, however it is a bit chaotic way of working.
public class MyScript : MonoBehaviour
{
     private int x;
     private int y;
     void Update()
     {
          x++;
          y++;
     }
}
Approach with ECS
In ECS, data and system are separated in their respective blocks, resulting in more cleaner code with better understanding.
public struct Position : IComponentData
{
     int x;
     int y;
}
class Move : ComponentSystem
{
     override void OnUpdate()
     {
           x++;
           y++;
     }
}
ECS Archetype
An archetype is a set of components which belongs to a certain entity, in short it’s a component signature. All component data is stored in 16kb chunks of memory called ArchetypeChunks. Archetype is a kind of container which holds a unique combination of component types.
For example:
In the following illustration, Entity A and Entity B share the same Archetype since they have the same components. But Entity C is having extra Component A which makes it different than the other.
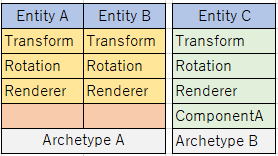
Consider ECS as a relational database where Archetypes are tables, components are columns and entities are indices within the table (rows).
Types of ECS
There are two types of ECS that Unity provides to work with:
• Pure ECS : Lots of boilerplate code required
• Hybrid ECS: Easy to work with
Workflow of ECS
Before we move onto creating an entity and coding with ECS, let's setup the functionalities required for ECS. As shown below, open Window/PackageManager and download the following packages.
Packages
1. Entities
2. Hybrid Renderer

Window/Package Manager
Note: Tick “Show preview packages” if you can’t find those packages in the dropdown list.
Creating an Entity
Create a new script called “ECSCubeSpawnner.cs” and assign it to any gameobject in the Hierarchy. However it’s better to create a new gameobject called “ECSCubeSpawnner” and assign “ECSCubeSpawnner.cs” script to it.

ECSCubeSpawnner Inspector view
So, let’s begin by creating our first cube with ECS. First we shall create a cube with pure ECS approach and then we shall do the same using hybrid ECS approach.
Pure ECS Approach
using UnityEngine;
using Unity.Entities;
using Unity.Transforms;
using Unity.Rendering;
using Unity.Mathematics;
public class CubeSpawnECS : MonoBehaviour
{
	[SerializeField] Mesh mesh;
	[SerializeField] Material material;
	private void Start()
	{
    		EntityManager entityManager = World.DefaultGameObjectInjectionWorld.EntityManager;
    		Entity entity = entityManager.CreateEntity(typeof(Transform), typeof(RenderMesh), typeof(RenderBounds), typeof(LocalToWorld));
    		entityManager.AddComponentData(entity, new Translation { Value = new float3(0, 0, 0) });
        	entityManager.AddSharedComponentData(entity, new RenderMesh { mesh = mesh, material 	= material });
	}
}

Above image shows the inspector window for adding a component in which you need to assign your desired mesh and material. As we are going to create a cube, I have added cube mesh and material in their respective field.
Now lets understand the previously mentioned code for creating a entity-cube step by step.
EntityManager entityManager = World.DefaultGameObjectInjectionWorld.EntityManager;
EntityManager is responsible for creating entities, so its reference has been included in our local variable. EntityManager can be obtained from current World.
Entity entity = entityManager.CreateEntity(typeof(Transform), typeof(RenderMesh), typeof(RenderBounds), typeof(LocalToWorld));
Next, by using above code, we can create our first entity with components associated with it. But it is not a proper way of writing the code. Instead of creating entity directly, its better to create Archetype first and then use it to create the entities. We can replace above code with the following correct code.
EntityArchetype entityArchetype = entityManager.CreateArchetype
(
typeof(Transform),
typeof(RenderMesh),
typeof(RenderBounds),
typeof(LocalToWorld)
);
Entity entity = entityManager.CreateEntity(entityArchetype);
Above code conveys that we are creating an Archetype first and then creating an entity with the same archetype. Unity needs to know archetype in order to store the data inside memory in a more optimized way.
entityManager.AddComponentData(entity, new Translation { Value = new float3(0, 0, 0) });float3</span>(0, 0, 0) });
Then we shall position the cube. I am placing the cube at (0, 0, 0) center of the screen.
entityManager.AddSharedComponentData(entity, new RenderMesh { mesh = mesh, material = material });
Finally, we have added the mesh and material which shall help ECS to show cube on the screen. Please do note that while adding the RenderMesh component we must use “AddSharedComponentData”.
Mesh and material are the components which RenderMesh expects from us. So we need to provide the same in the inspector window and assign desired mesh and materials in their respective fields. Also please note that we need to use “RenderBounds” and “LocalToWorld” components in order to make the Cube visible on the screen.
Before we move forward, play and check the Game Window as well as EntityDebugger Window. We have our Cube in the game window but it will not be available in the Hierarchy. In order to view the same we have to open EntityDebugger window.

Unlike GameObject the red cube can be visible in the game window but not in the Hierarchy
Now let’s check our EntityDebugger Window. Go to Window / Analysis / Entity Debugger for the same.
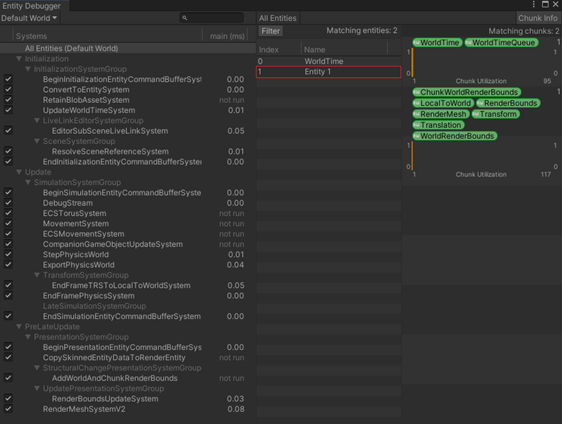
Entity Debugger window
We can see our Entity in our Entity Debugger. We have WorldTime and other entities. And on the right hand side we can see different components associated with our Entity, which we have just assigned to our entity in the code.
Hybrid ECS Approach
Now, let’s create the same cube using Hybrid ECS. Also I shall create a simulation so that we can compare ECS simulation with traditional workflow.
Hybrid ECS is very straightforward and we do not need to write boilerplate code. Follow below steps to create a cube using hybrid ECS.
1. Just create new cube mesh in the Hierarchy.
2. Then add a new component. DOTS/ConvertToEntity
3. Then drag it to the asset folder to create a prefab of it.
Add Component 【Dots/ConvertToEntity】
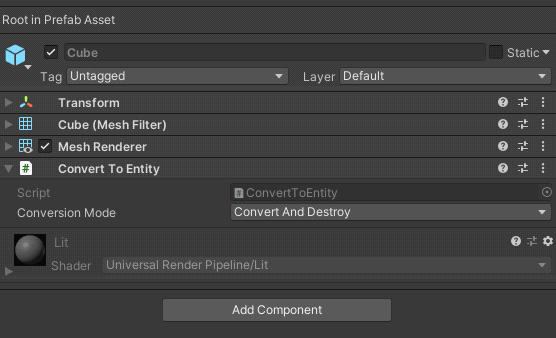
We are halfway through without writing a single code. We replaced code written in pure ECS approach by just adding “DOTS/ConvertToEntity” script to the Cube Prefab. If you wish to convert your existing game in DOTS pattern, then all you need to do is to add “DOTS/ConvertToEntity” script to your prefabs.
Spawning our ECS cube prefab
using UnityEngine;
using Unity.Entities;
using Unity.Transforms;
using Unity.Rendering;
using Unity.Mathematics;

public class CubeSpawnECS : MonoBehaviour
{	[SerializeField] GameObject ecsPrefab;
	private void Start()
	{
    	EntityManager entityManager = World.DefaultGameObjectInjectionWorld.EntityManager;
    	var setting = GameObjectConversionSettings.FromWorld(entityManager.World, null);
    	Entity entityPrefab = GameObjectConversionUtility.ConvertGameObjectHierarchy(ecsPrefab, setting);
    	Entity entity = entityManager.Instantiate(entityPrefab);

	}
}
This time we need to assign the reference of our newly created cubePrefab to ecsPrefab in the inspector window as shown below.

Assign Cube Prefab to EcsPrefab slot
Here in this approach, we do not have to create an Archetype of our Entity. “DOTS/ConvertToEntity” will do that for us. Rather we are just instantiating our Cube prefab by using entityManager.Instantiate() method instead of GameObject.Instantiate() method.
The output is similar to pure ECS approach. Cube can be seen on the screen created by hybrid ECS method. You can check the components associated with the entity in the Entity Debugger window as shown previously.
Creating a Torus simulation using ECS
We shall now compare the performance of a simulation using the cube we just created in ECS and traditional way of MonoBehaviours in OOP.
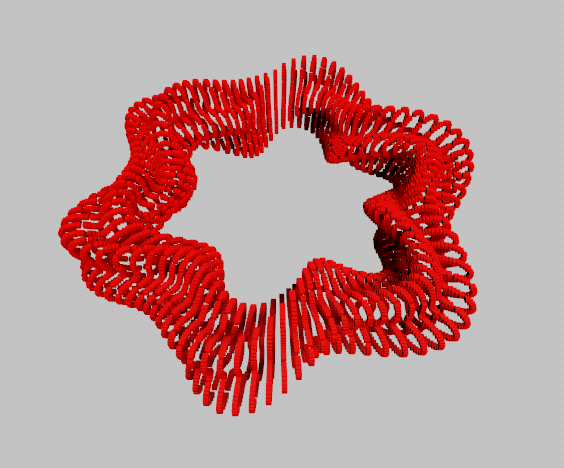
For testing the performance of ECS simulation, let's create a simulation using multiple cubes. In other words, in this simulation we will be using single cube as one particle of our whole torus. So there would be thousands of cubes to make one perfect torus as shown in the following image.
Torus ECS Simulation scripts
In order to achieve the torus simulation we need to create three new C# scripts as per below-
1. ECSTorusSpawn : To spawn our ECS prefabs.
2. ECSTorusComponent : Torus simulation data class.
3. ECSTorusSystem : Torus simulation logic class.

1. ECSTorusComponent
Following represents code for torus structure.
using Unity.Entities;
[GenerateAuthoringComponent]
public struct ECSTorusComponent : IComponentData
{
	public static int zVAl = 0;
	public static float step;
	public static int resolution;

	public int xAxis;
	public int index;
}
Code Explanation
As we are animating each and every cube around the circle, we need some variables to get information about each cube.
ZVal, step and resolution are the static variables which are used to store the global data about our torus.
xAxis and index have the specific data of each cube, which we require to calculate the position of the cube.
2. ECSTorusSystem
Following represents code for torus structure.
using UnityEngine;
using Unity.Entities;
using Unity.Transforms;
using Unity.Mathematics;

public class ECSTorusSystem : ComponentSystem
{
    	public static float time;
	protected override void OnUpdate()
	{
            	float step = ECSTorusComponent.step;
            	float resolution = ECSTorusComponent.resolution;

            	time += Time.DeltaTime;
            	float v = 0.5f * step - 1f;

            	Entities.WithAll<ECSTorusComponent>().ForEach((ref Translation trans, ref 	ECSTorusComponent torusComponent) =>
    	   	{

                    	float x = torusComponent.xAxis;
                    	int z = ECSTorusComponent.zVAl;

                    	if (x == 0)
                    	{
                            	z += 1;
                            	v = (z + 0.5f) * step - 1f;
                    	}
                    	ECSTorusComponent.zVAl = z;

                    	float u = (x + 0.5f) * step - 1f;
                    	trans.Value = RunTorus(u, v, time);

                    	if (torusComponent.index >= resolution * resolution)
                            	ECSTorusComponent.zVAl = 0;
            	});
	}
    	float3 RunTorus(float u, float v, float t)
    	{
            	 	float r1 = 0.7f + 0.1f * math.sin(math.PI * (6f * u + 0.5f * t));
            		float r2 = 0.15f + 0.05f * math.sin(math.PI * (8f * u + 4f * v + 2f * t));
            		float s = r2 * math.cos(math.PI * v) + r1;
            		Vector3 p;
            		p.x = s * math.sin(math.PI * u);
            		p.y = r2 * math.sin(math.PI * v);
            		p.z = s * math.cos(math.PI * u);
            		return p;
    	}
}
Above code contains mathematical equations to have circulating cube to form torus. In short, we are taking all the entities into account and then are calculating position of each entity and assigning a new position to it. The same is repeated to get a smooth simulation of a torus. The code could be a bit difficult to understand, but we are not going to go in depth of the process here. Since our target today is to determine the performances of ECS simulation and the traditional one. I encourage you to learn more about this mathematics in this blog-> Cat like coding.
3.ECSTorusSpawn
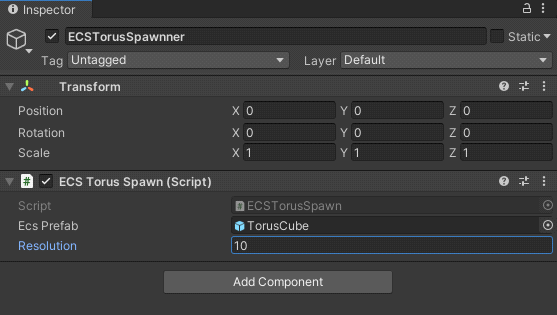
Now before we play, we need to initialize our data inside the “ECSCubeSpawner” script.
using UnityEngine;
using Unity.Entities;
using Unity.Transforms;
using Unity.Collections;

public class ECSTorusSpawn : MonoBehaviour
{
	[SerializeField] GameObject ecsPrefab;
	[SerializeField] int resolution;

	private void Start()
	{
    		DrawWithHybridECS();
	}

	void DrawWithHybridECS()
	{
    	EntityManager entityManager = World.DefaultGameObjectInjectionWorld.EntityManager;
    	var setting = GameObjectConversionSettings.FromWorld(entityManager.World, null);
    	Entity entityPrefab = GameObjectConversionUtility.ConvertGameObjectHierarchy(ecsPrefab, 	setting);

    	NativeArray<Entity> EntitiesToDraw = new NativeArray<Entity>(resolution * resolution, 	Allocator.Temp);

    	float step = 2f / resolution;
    	ECSTorusComponent.step = step;
    	ECSTorusComponent.resolution = resolution;
    	for (int i = 0, x = 0; i < EntitiesToDraw.Length; i++, x++)
    	{
        	if (x == resolution)
            	x = 0;
        	EntitiesToDraw[i] = entityManager.Instantiate(entityPrefab);
	entityManager.AddComponentData(EntitiesToDraw[i], new Scale { Value = step });
	entityManager.SetComponentData(EntitiesToDraw[i], new ECSTorusComponent { xAxis = x, 	index = i});
    	}

    	EntitiesToDraw.Dispose();
	}
}
Code Explanation
Here we are spawning N numbers of cubes based on resolution. The above code is almost same as the code that was used to create the cube. But this time we have added NativeArray
In the above code we are spawning Resolution * Resolution cubes. So let’s say if resolution value is 10 then 100 cubes will be spawned.
This is what the inspector window would look like.
Time for testing our simulation.
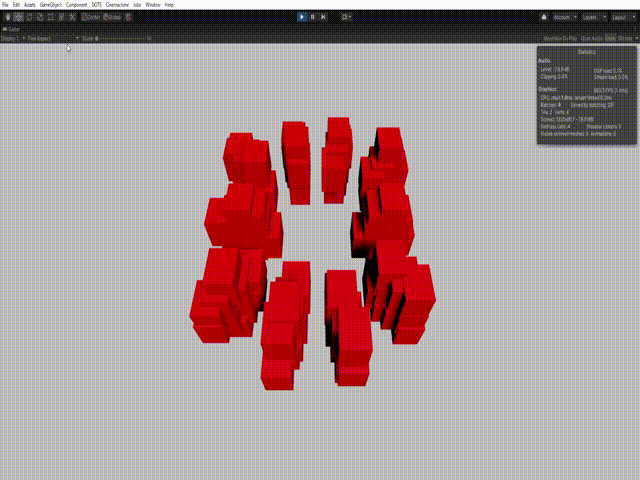
Since we have set resolution to 10, only 100 cubes are present in the simulation on the screen, not so interesting. Now lets increase the number of cubes to get better simulation.
Performance comparison of Torus simulations
Tours simulation using ECS
Now let’s spawn 10,000 entities and check the profiler. Set the resolution to 100.
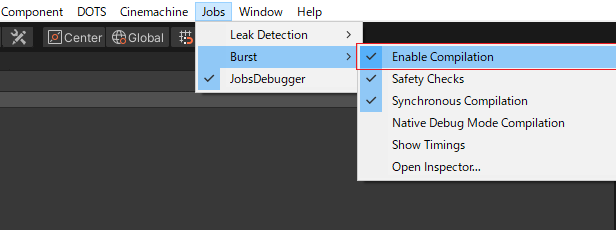
But before we run our simulation enable the burst compiler from [Jobs/Burst/Enable Compiler] this will give extra boost to our simulation.
Now press play button.
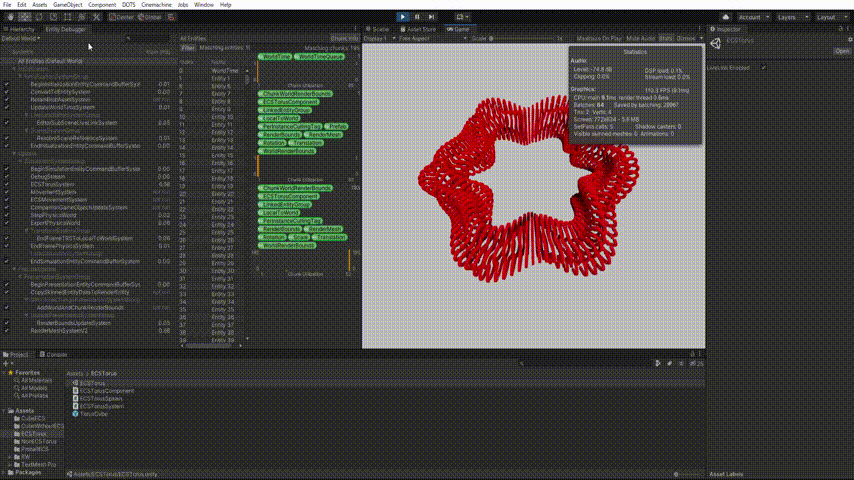
Torus simulation with ECS approach
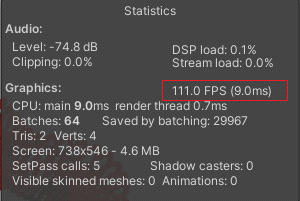
In the above simulation we are getting 111.0 FPS (9.0ms). with 10,000 active entities.
Torus simulation with MonoBehaviour
Here also we are spawning same number of objects using traditional method.
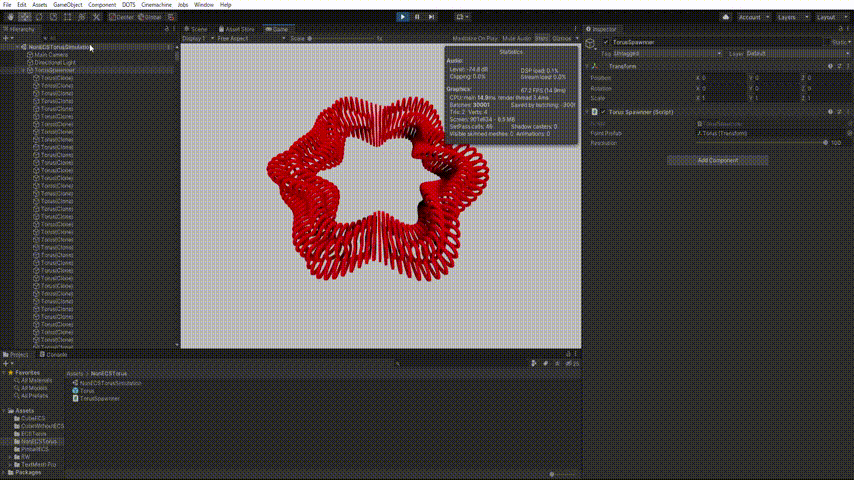
Torus simulation with MonoBehaviour approach

In the above simulation we are just getting 63 FPS (15.8ms) for the same number of objects.
Conclusion
With the comparison of torus simulations of ECS and MonoBehaviours, it has been established that ECS simulation has better performance than that with the traditional one. In the ECS simulation, even with 10,000 active entities on the screen we are getting pretty good FPS 111.0 FPS (9.0ms). However in the MonoBehaviour simulation, we are just getting 63 FPS (15.8ms), which means ECS has given twice the FPS for same number of entities/object. We could get even better FPS than this if we use C# job system and burst compiler. But that would be for the next blog.
Thank you for reading.